CYLINDER MACHINES (Continued)

Setting the Register Rack
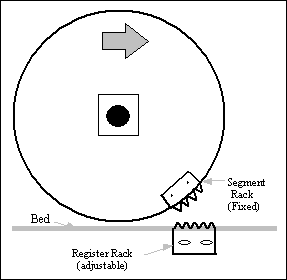
For perfect register it is essential that the impression cylinder should, from commencement to finish of printing, operate in complete harmony with the type bed, irrespective of possible disturbing factors such as backlash or play in the gears, the fall of the cylinder, etc. In effect the grip edges of the cylinder must be brought into correct relationship with the type bed, prior to commencement of printing, by positive means. This is achieved by means of the short segment and rack with which the cylinder and type bed are fitted.
The leading teeth of the segment rack are relieved in varying degree. This ensures, as the gear and rack run into mesh, that the engagement is gradually and smoothly brought about. The remaining teeth are of standard size and thickness. Before the cylinder is hard down on the type bearers, the rack should have performed its function, and prior to this the tapered ends of the type bed bearers in conjunction with the leading teeth of the segment rack enable the pressure of the cylinder to be taken up gradually and without shock.
A broad slur across the front edge of the impression cylinder will indicate the leading edge of the register rack is worn. (When machine is on printing stroke, the upper traverse rack is engaged.)
1. With the cylinder tripped for impression, turn the press over until the type bed register rack comes into mesh centrally with the first three teeth on the cylinder segment rack and then

check for excess movement. The maximum clearance between segment and register rack is .005''. Register rack can be shimmed up if worn.
2 Turn the cylinder around by hand for one revolution again stopping when racks are well in mesh.
3. Tighten the bolts carefully, only enough so the bolts cannot be moved by hand but the rack can be tapped with a light hammer if necessary.
4. Turn the press over slowly under power for two revolutions then stopping again and tightening the bolts up further.
5. Now increase the speed of the press to its normal running speed then stop and make the final tightening.
6.  Now apply the paper test.

Setting Bed Gibbs (English Miehles)
The bed of the machine is held in position sideways by bed gibbs. These are found on each corner of the bed bolted on underneath.

Bed

The bed gibbs should be set to .0015" clearance sideways - .00075 either side. The gibbs should be kept continually lubricated otherwise wear will quickly result. NOTE: Any adjustments made below the centreline of axle of machine must be made with the impression "on", any above the centreline of the axle must have the impression "off".

Anti-Set-Off Devices
Set-off can be caused by any one of the following:
1.  Poor makeready.
2.  Excessive colour.
3.  Incorrectly set rollers.
4.  Sheets being moved by joggers in delivery.
5.  Incorrect ink for stock.
6.  Poor quality stock.
7.  Rough handling
8.  A spray gun may help to overcome this but it should always be remembered that a spray gun is
bwnot a cure for bad workmanship.
The Wet Spray Gun
The air pressure required to operate this type of gun is between 30 and 40 pounds per square inch, and the height of the nozzle should be approximately equal to the diagonal width of the sheet. The solution used in a wet spray gun is a mixture of alcohol, gum arabic and starch. Care should be taken in the gun as a small amount of air and a large amount of liquid will result in large particles of spray and vice versa. The strength of the spray is controlled by adjustment of the control screw at the top of the gun. Screwing the control down will increase the weight of the piston spring, causing a smaller lift of the needle and reducing the amount of spray emitted. Unscrewing has the reverse effect.
The wet spray gun must be clean and maintained correctly to ensure correct working.
The Dry Spray Gun
The powder is a mixture of starch, calcium carbonate and talc and is available in varying particle sizes. Art paper and coated stock require a fine power, whereas cards and other heavy stock need a courser powder.
When setting a spray gun, the following adjustments should be made; correct height, correct amount of air/mixture and length of trigger stroke.

*Remember always start with the finest setting as possible then, if necessary increase air or mixture. Excess spray causes its own problems such as inability to overprint, filling in of  formes and an uneven pile in automatic feeding devices.

HOME